Customer Statement LinkUpdated 16 days ago
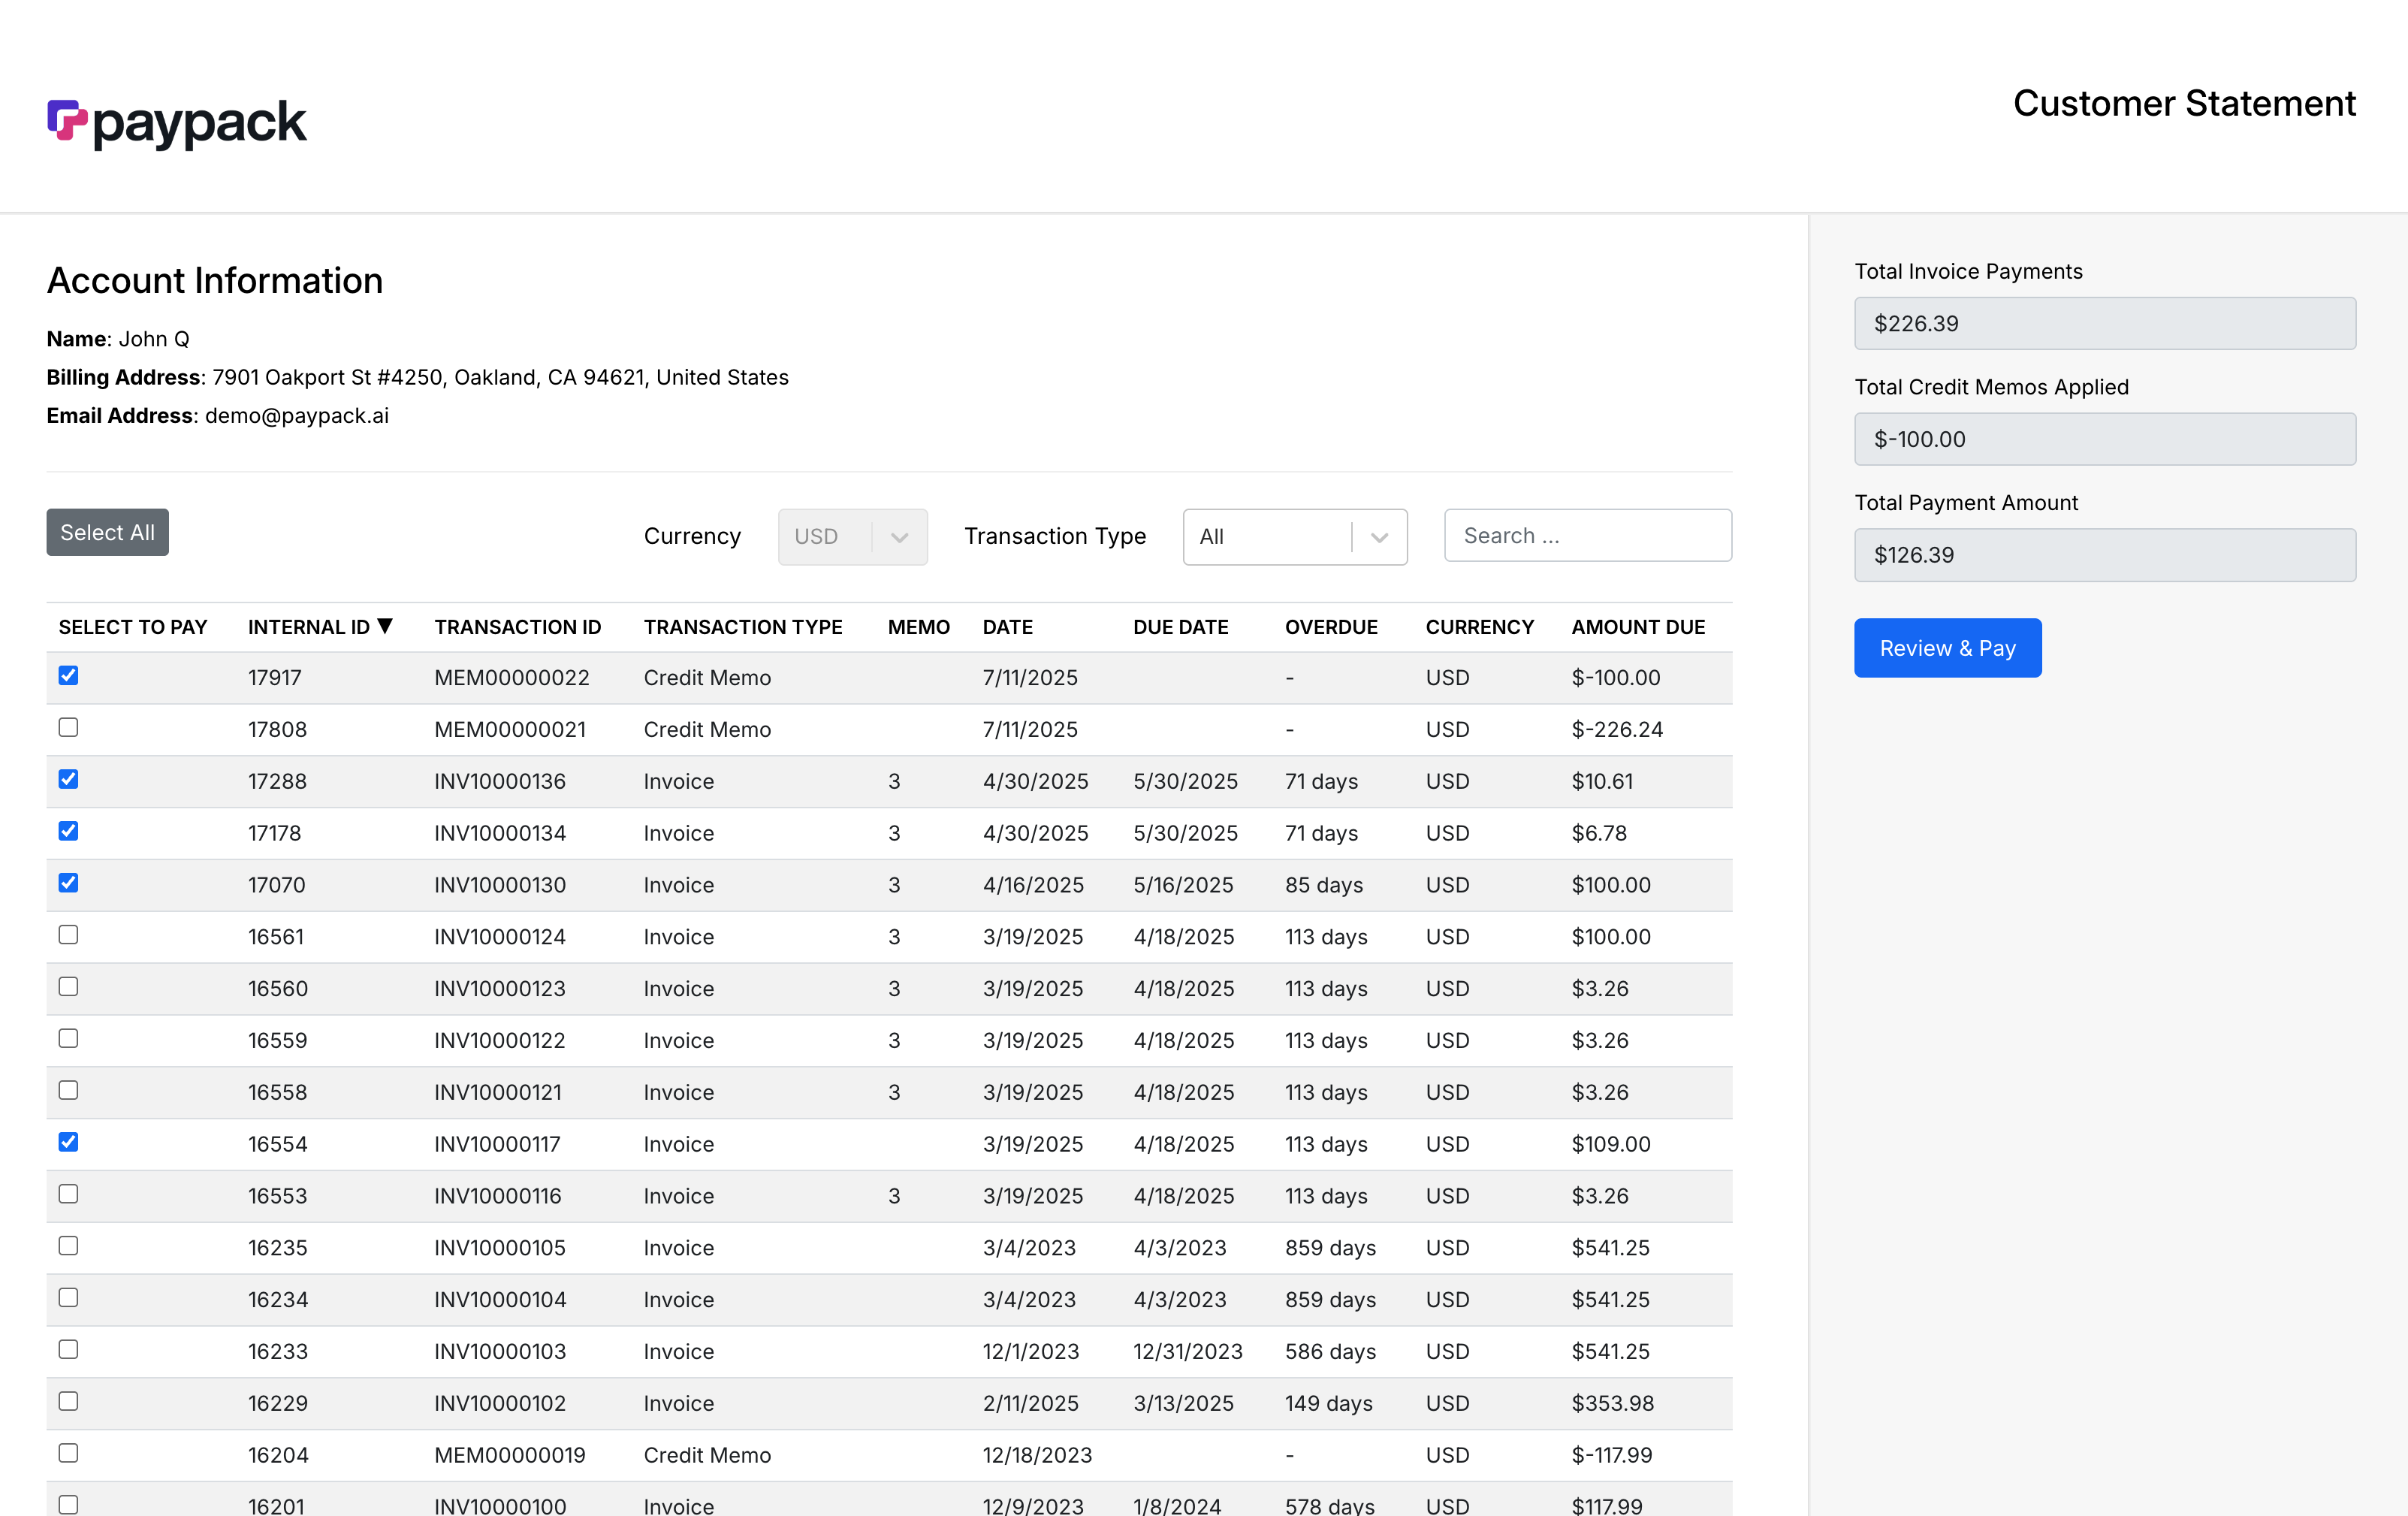
The PayPack Customer Statement Link is a powerful feature that gives your customers a secure, personalized portal to view and pay their open invoices and credit memos. This unique link provides a real-time view of their account, allowing them to select which items to pay and settle their balance easily. The entire process is automated, from payment submission to record creation in NetSuite, ensuring a seamless and traceable transaction.
Key Features
- Currency-Specific Filtering: If a customer has transactions in multiple currencies, a dropdown menu appears on their statement page, allowing them to filter and view invoices and credit memos for a single currency at a time.
- Selective Payments: Customers have the flexibility to select specific invoices and credit memos they wish to pay, enabling partial or targeted settlements of their outstanding balance.
- Automated Record Creation: When a customer initiates a payment, a PayPack Customer Statement Log is created in NetSuite to track the transaction. After a successful payment, all related records—like Customer Payments and Credit Memo Applications—are automatically generated and linked.
- Stripe & NetSuite Linkage: For easy reconciliation, a direct URL to the PayPack Customer Statement Log in NetSuite is added to the metadata of the corresponding Stripe Payment Intent.
Implementation and Setup
You can generate statement links for new and existing customers.
Link Generation for Customers
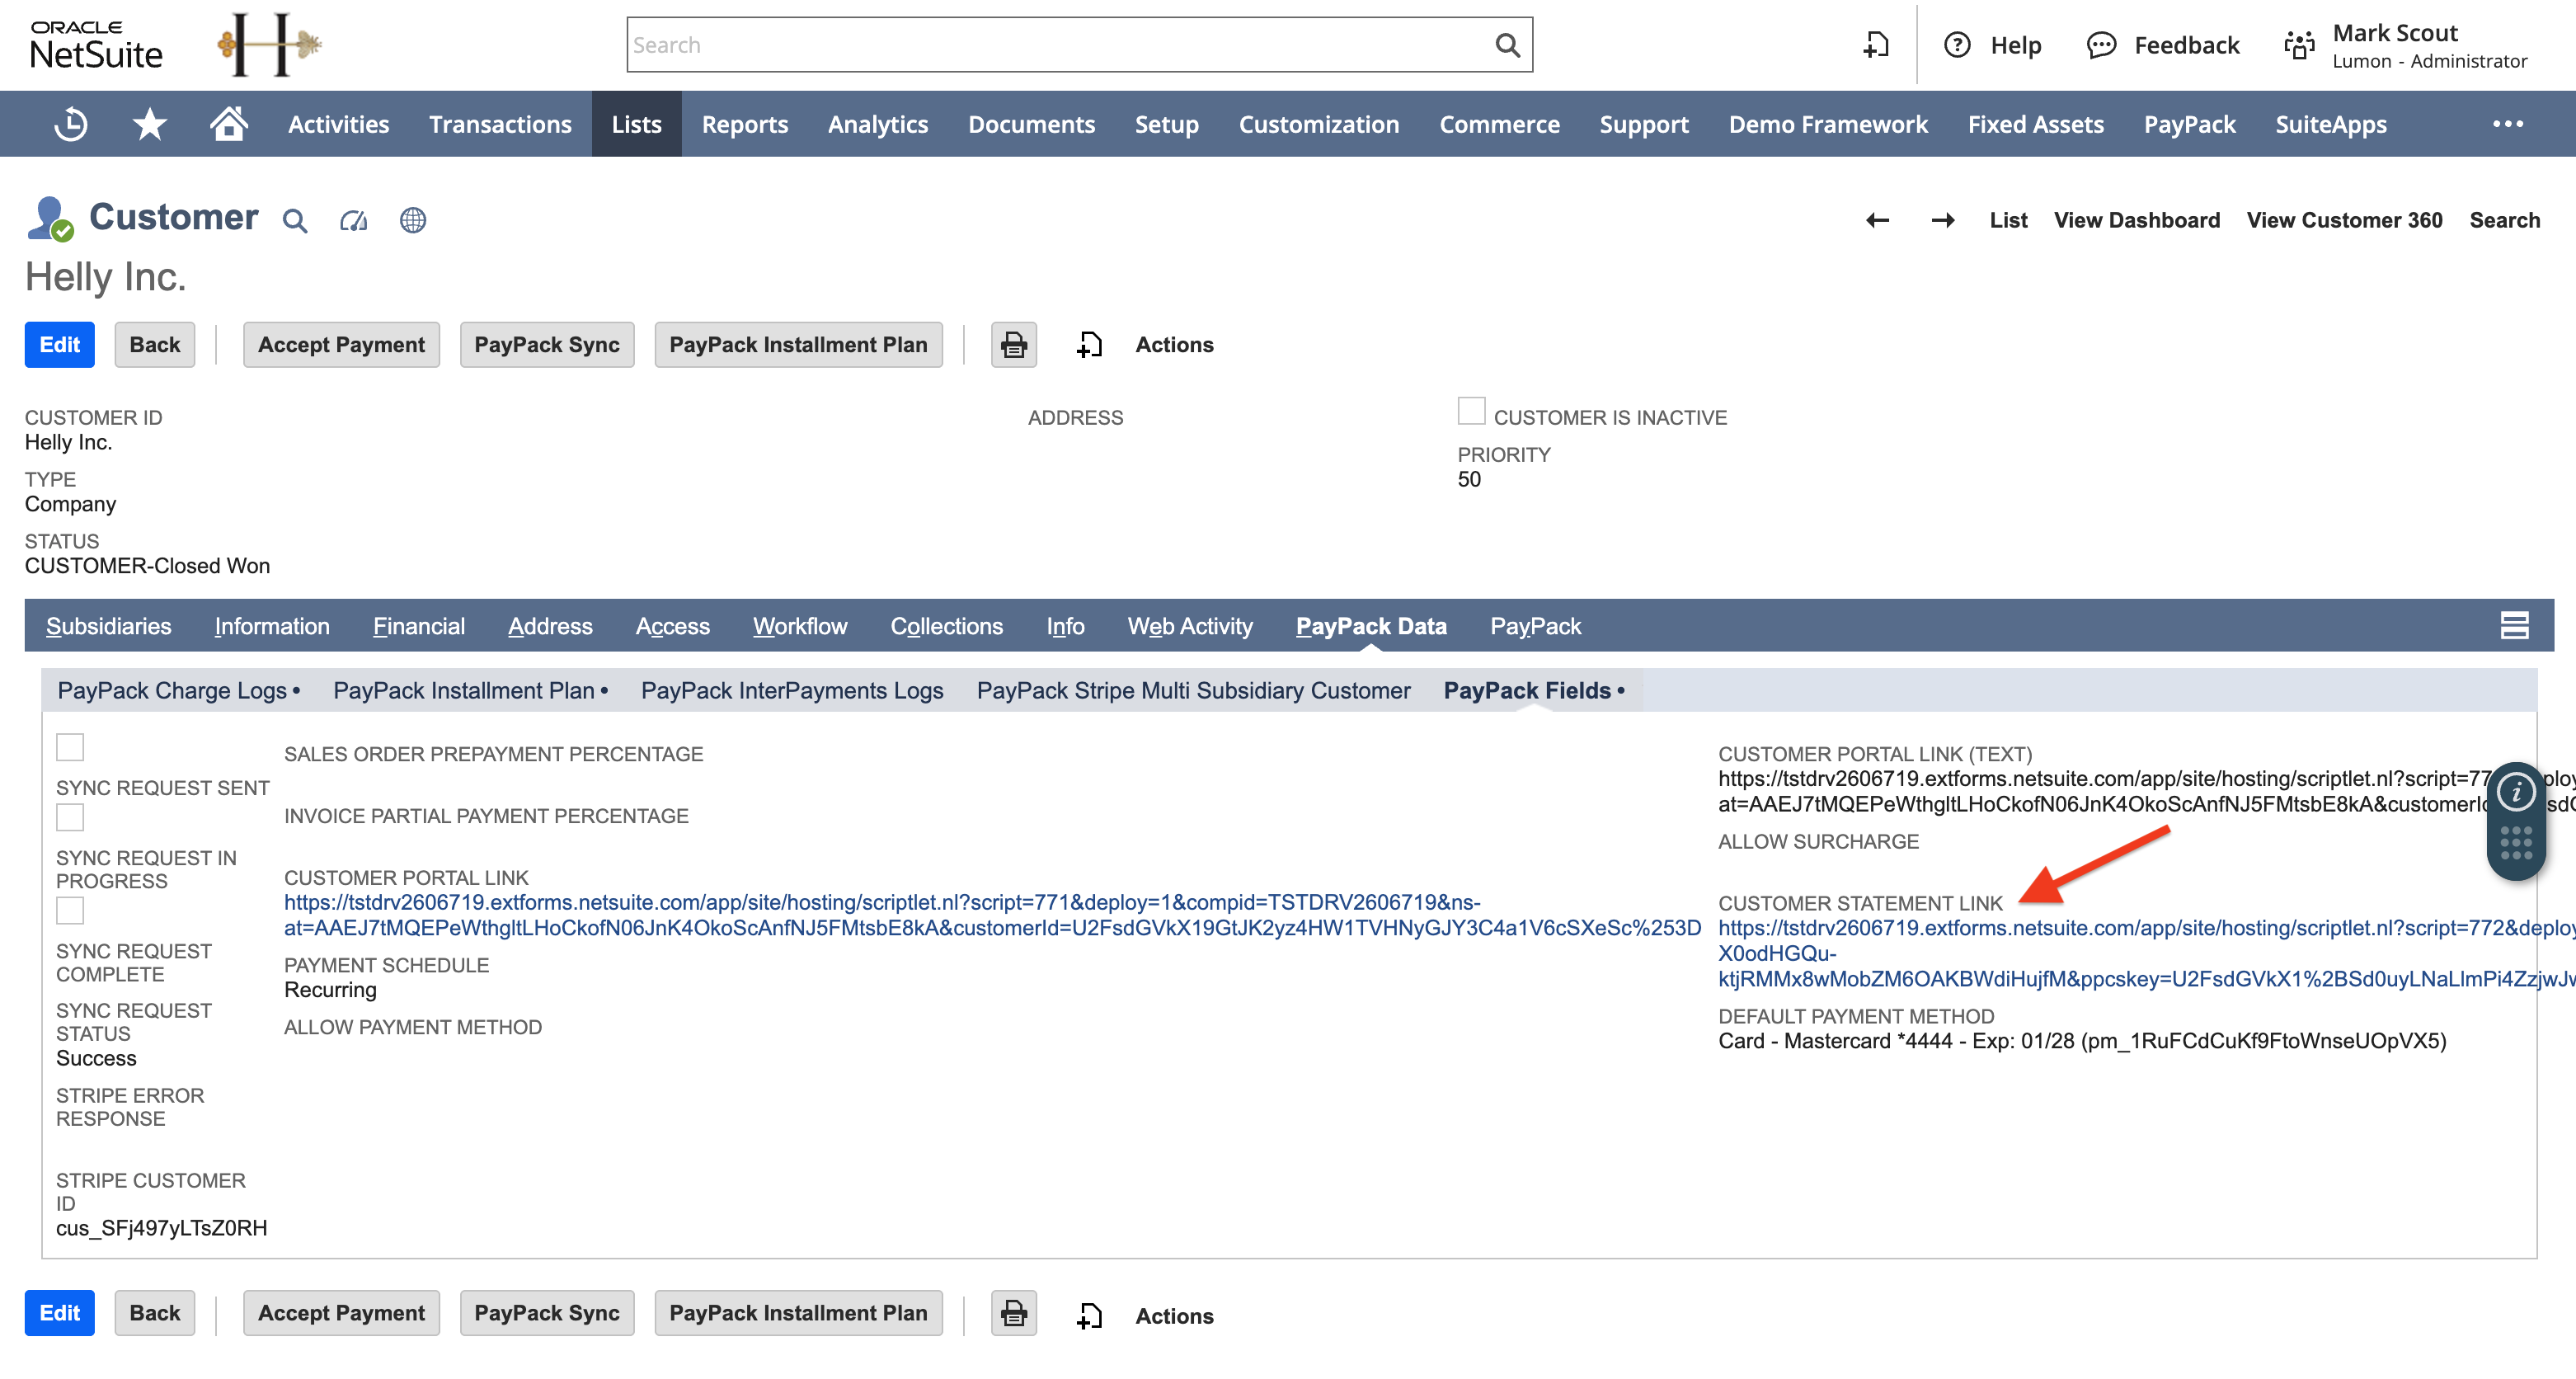
- For New Customers: A unique link is automatically generated and stored on the customer record as soon as it's created in NetSuite.
- For Existing Customers: You can run a Map/Reduce script to retroactively generate these unique links for your entire existing customer base.
Setting Up the 'Generate Customer Statement Link' Script
This setup is required to generate links for existing customers or if you need to manage links across multiple Stripe accounts.
Step 1: Configure the Saved Search
First, you must assign the correct saved search template in the configuration settings.
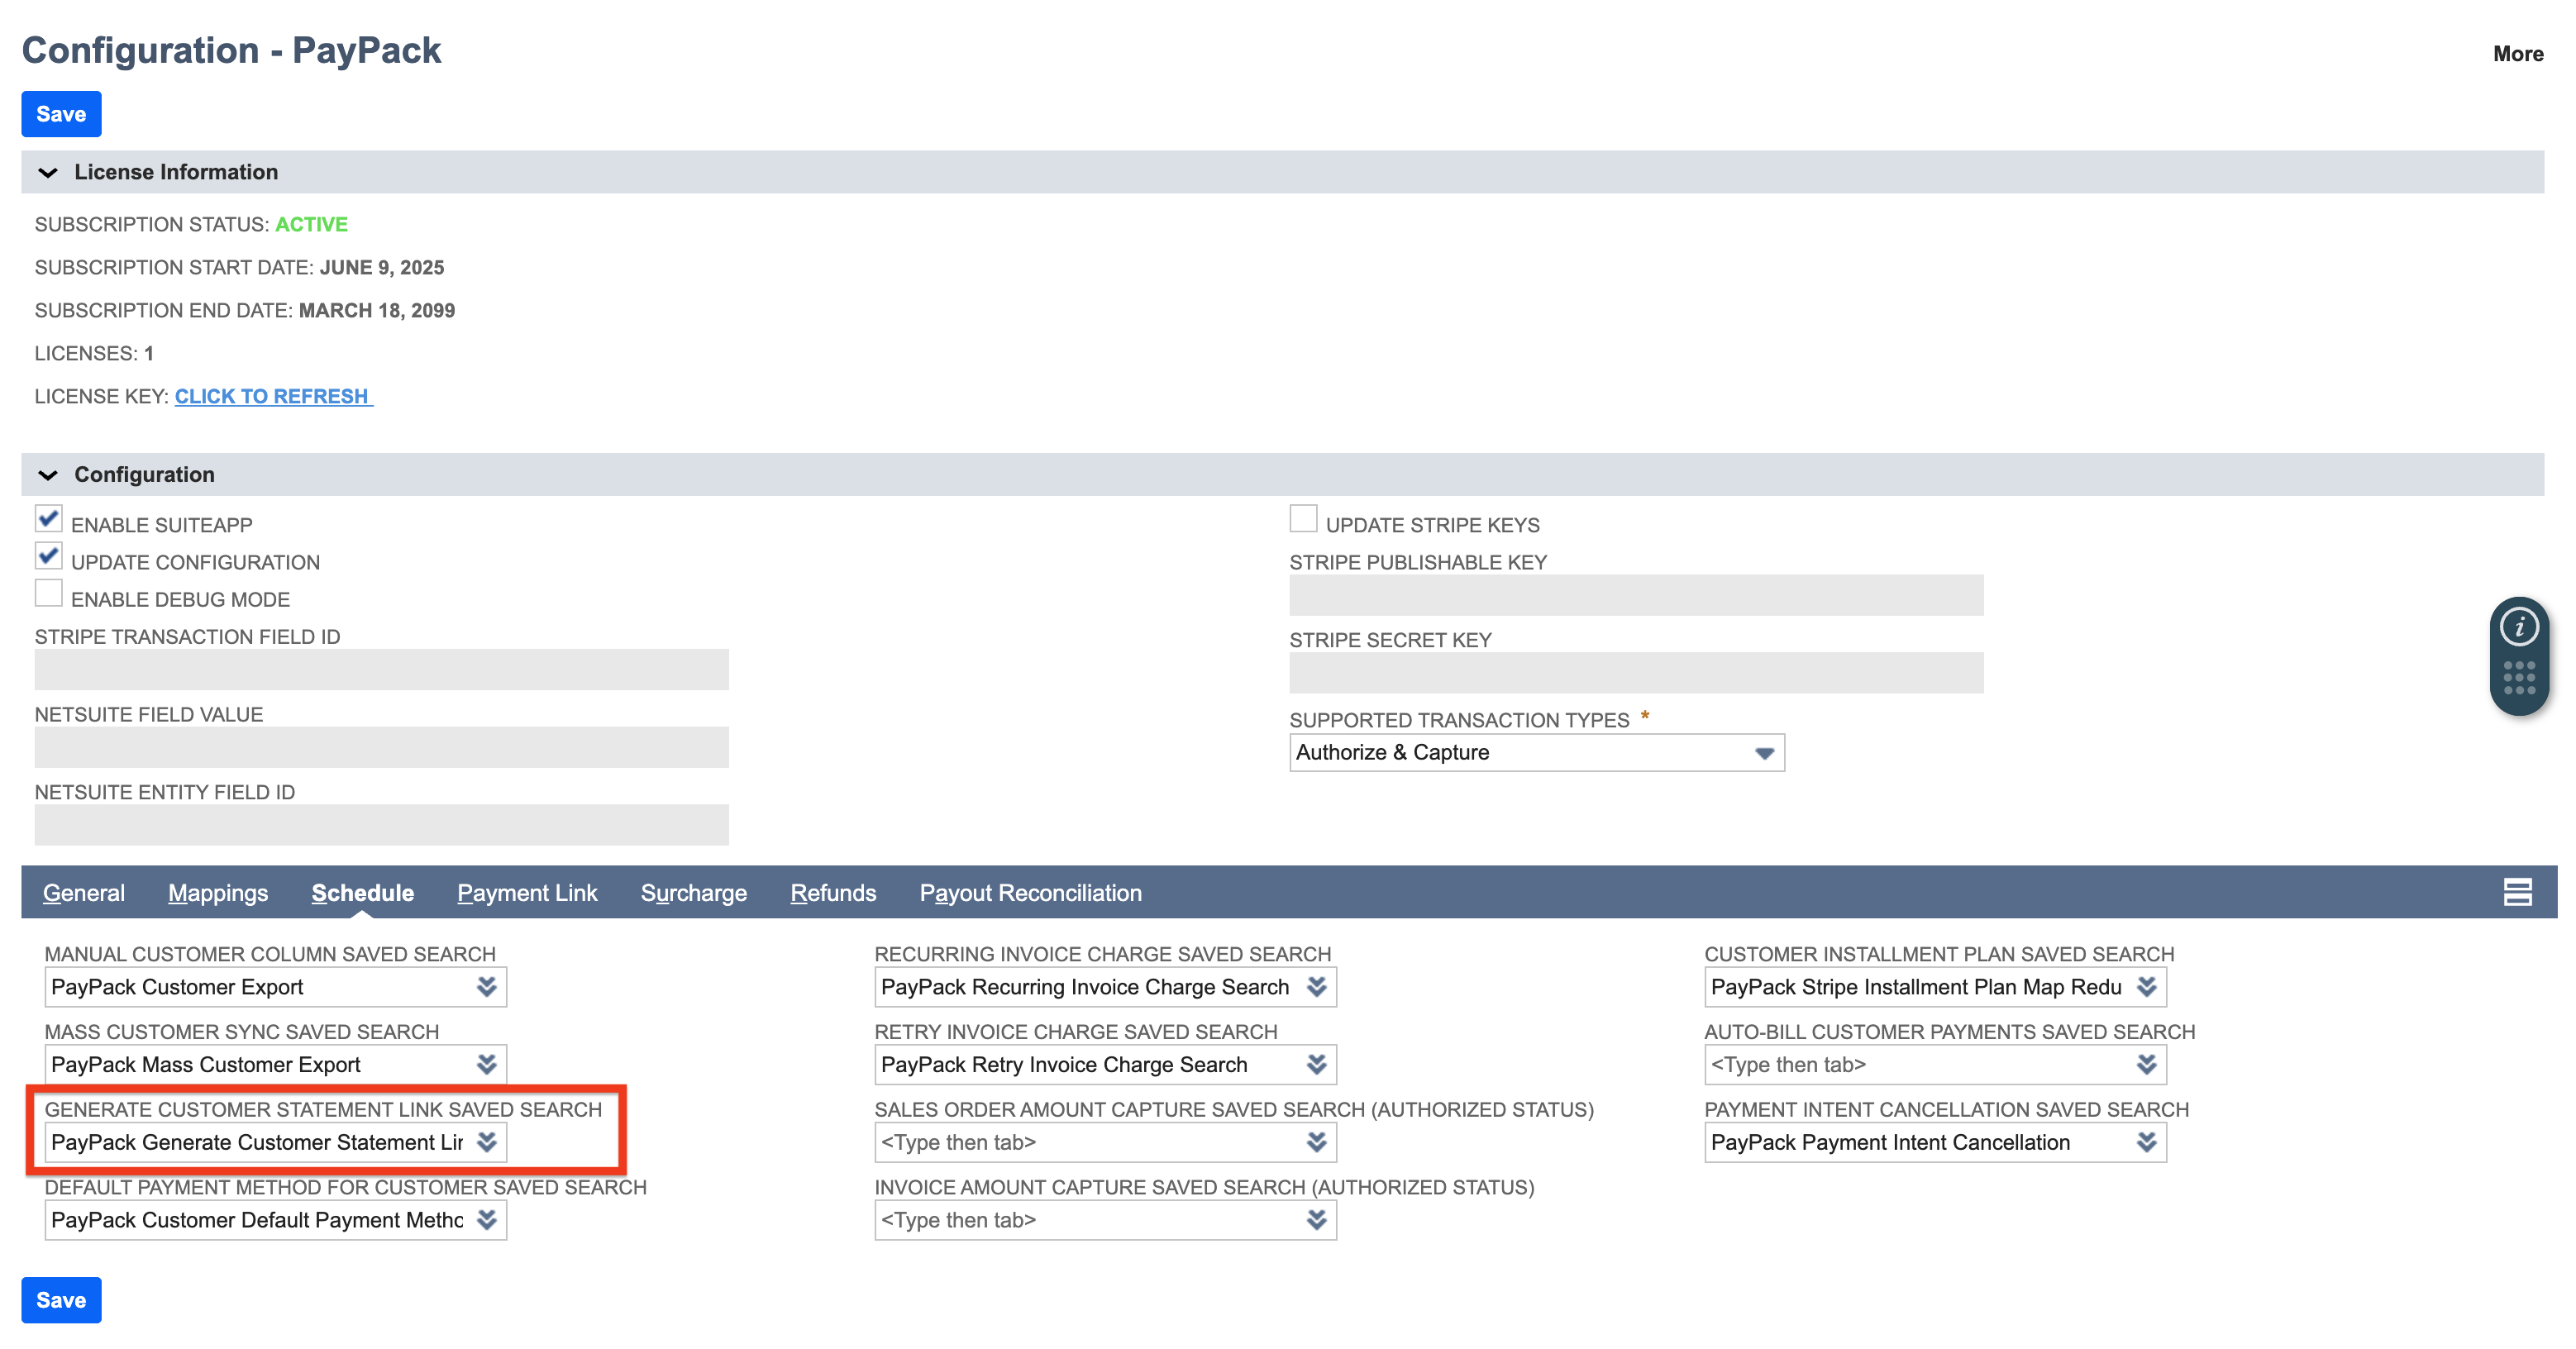
- Navigate to PayPack → Setup → Configuration.
- Go to the Schedule subtab.
- In the Generate Customer Statement Link Saved Search dropdown, select the saved search template (e.g., Template - PayPack Generate Customer Statement Link).
- Click Save.
Step 2: Deploy the Script
Next, you need to create and schedule the deployment for the Map/Reduce script.
- Navigate to Customization → Scripting → Scripts.
- Use the Type filter to show only Map/Reduce scripts.
- In the search bar, find PayPack Generate Statement Link MR and click View.
- On the script page, click Deploy Script.
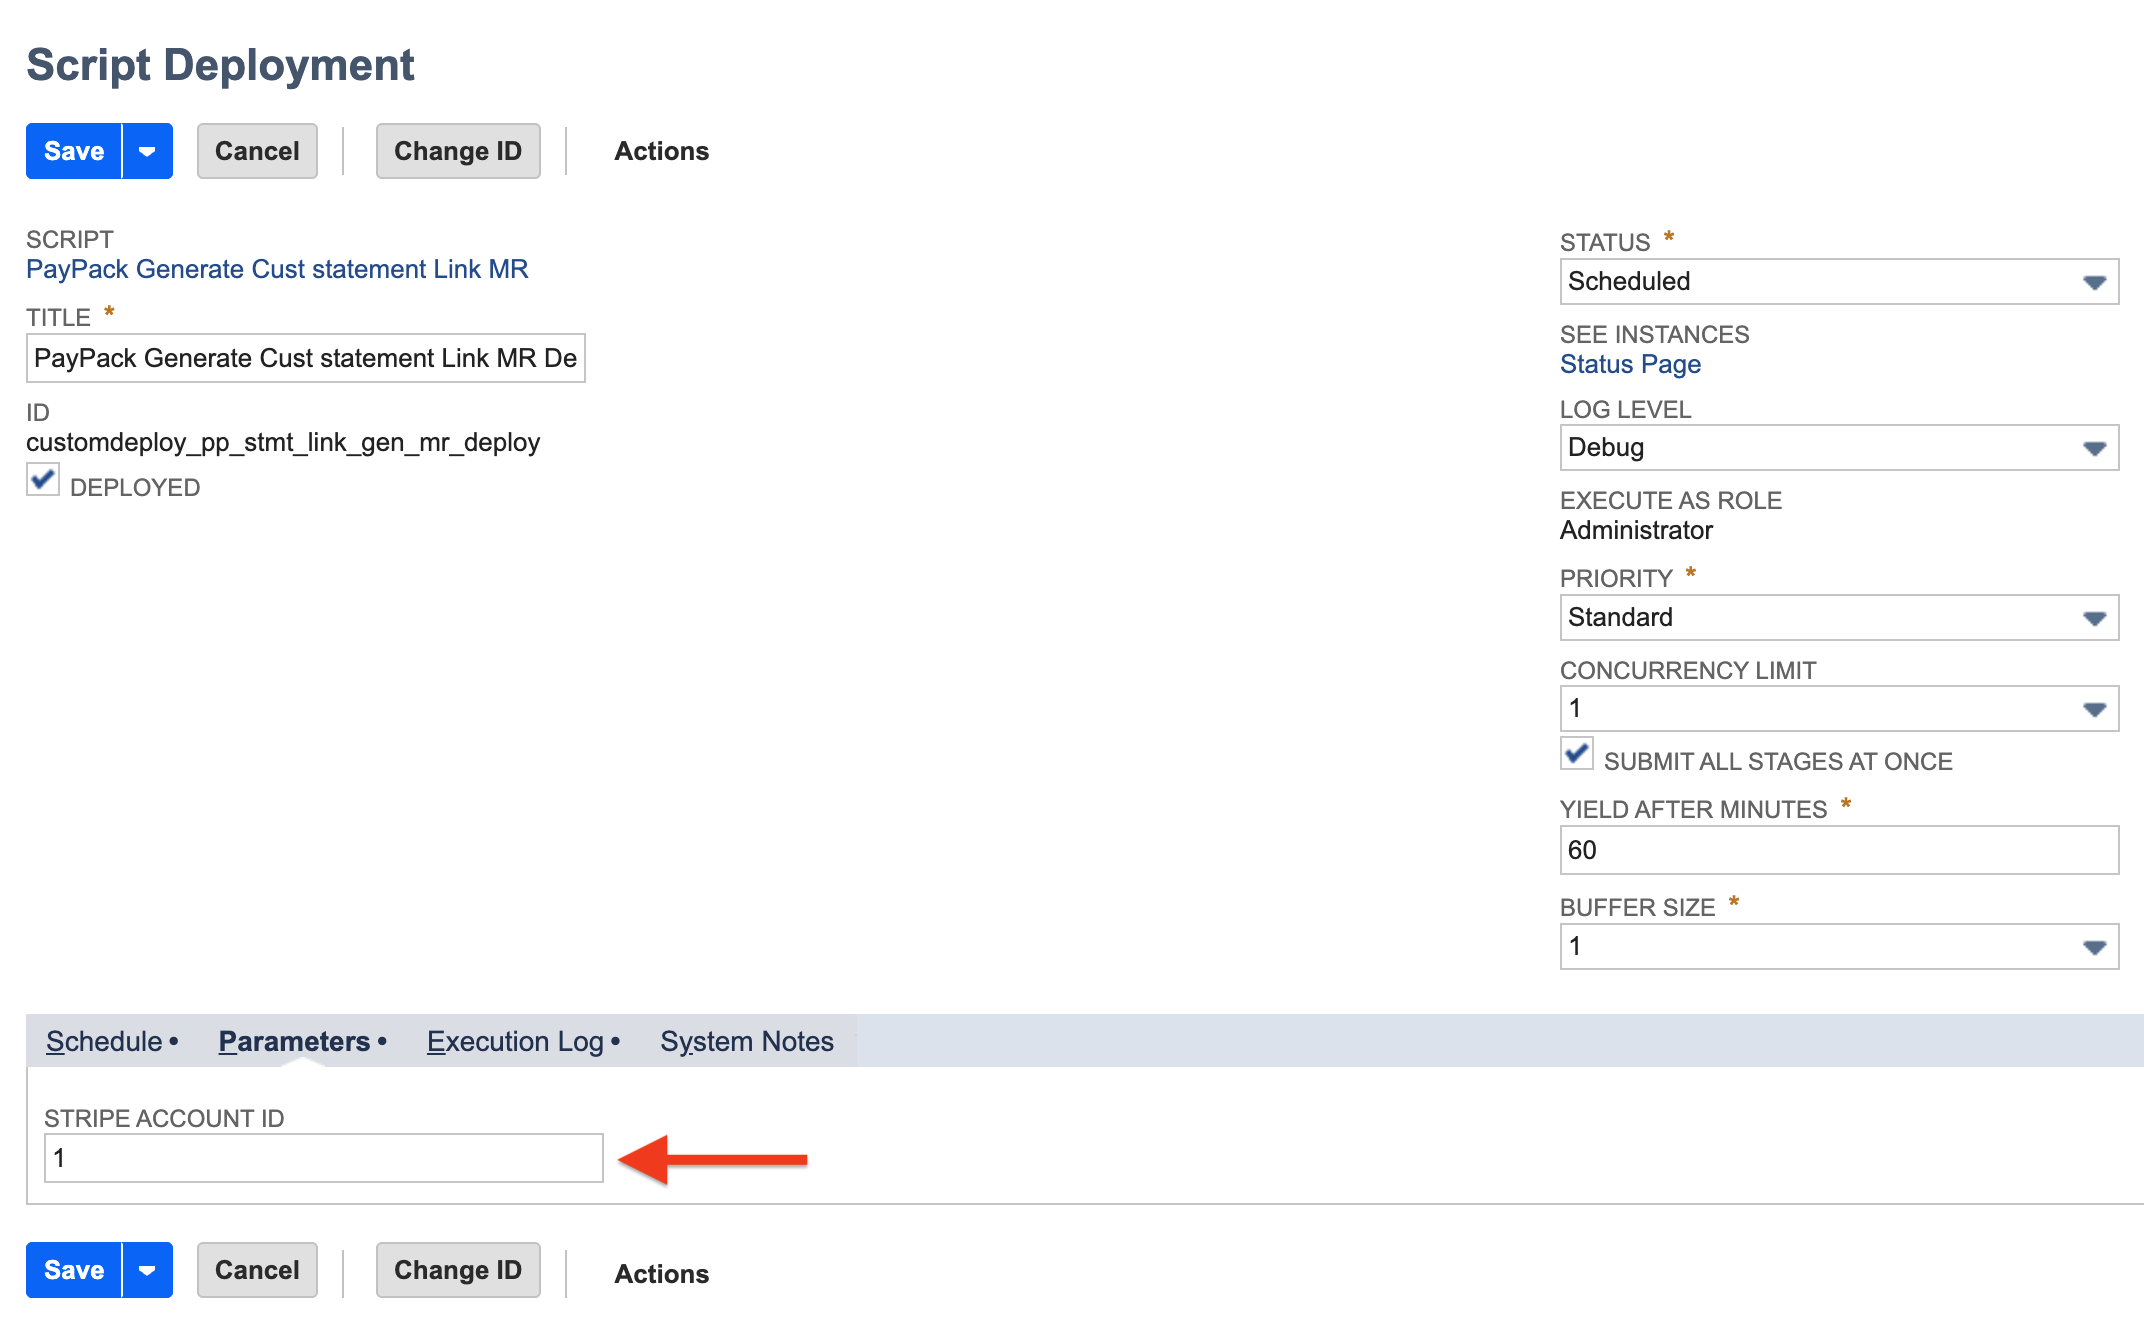
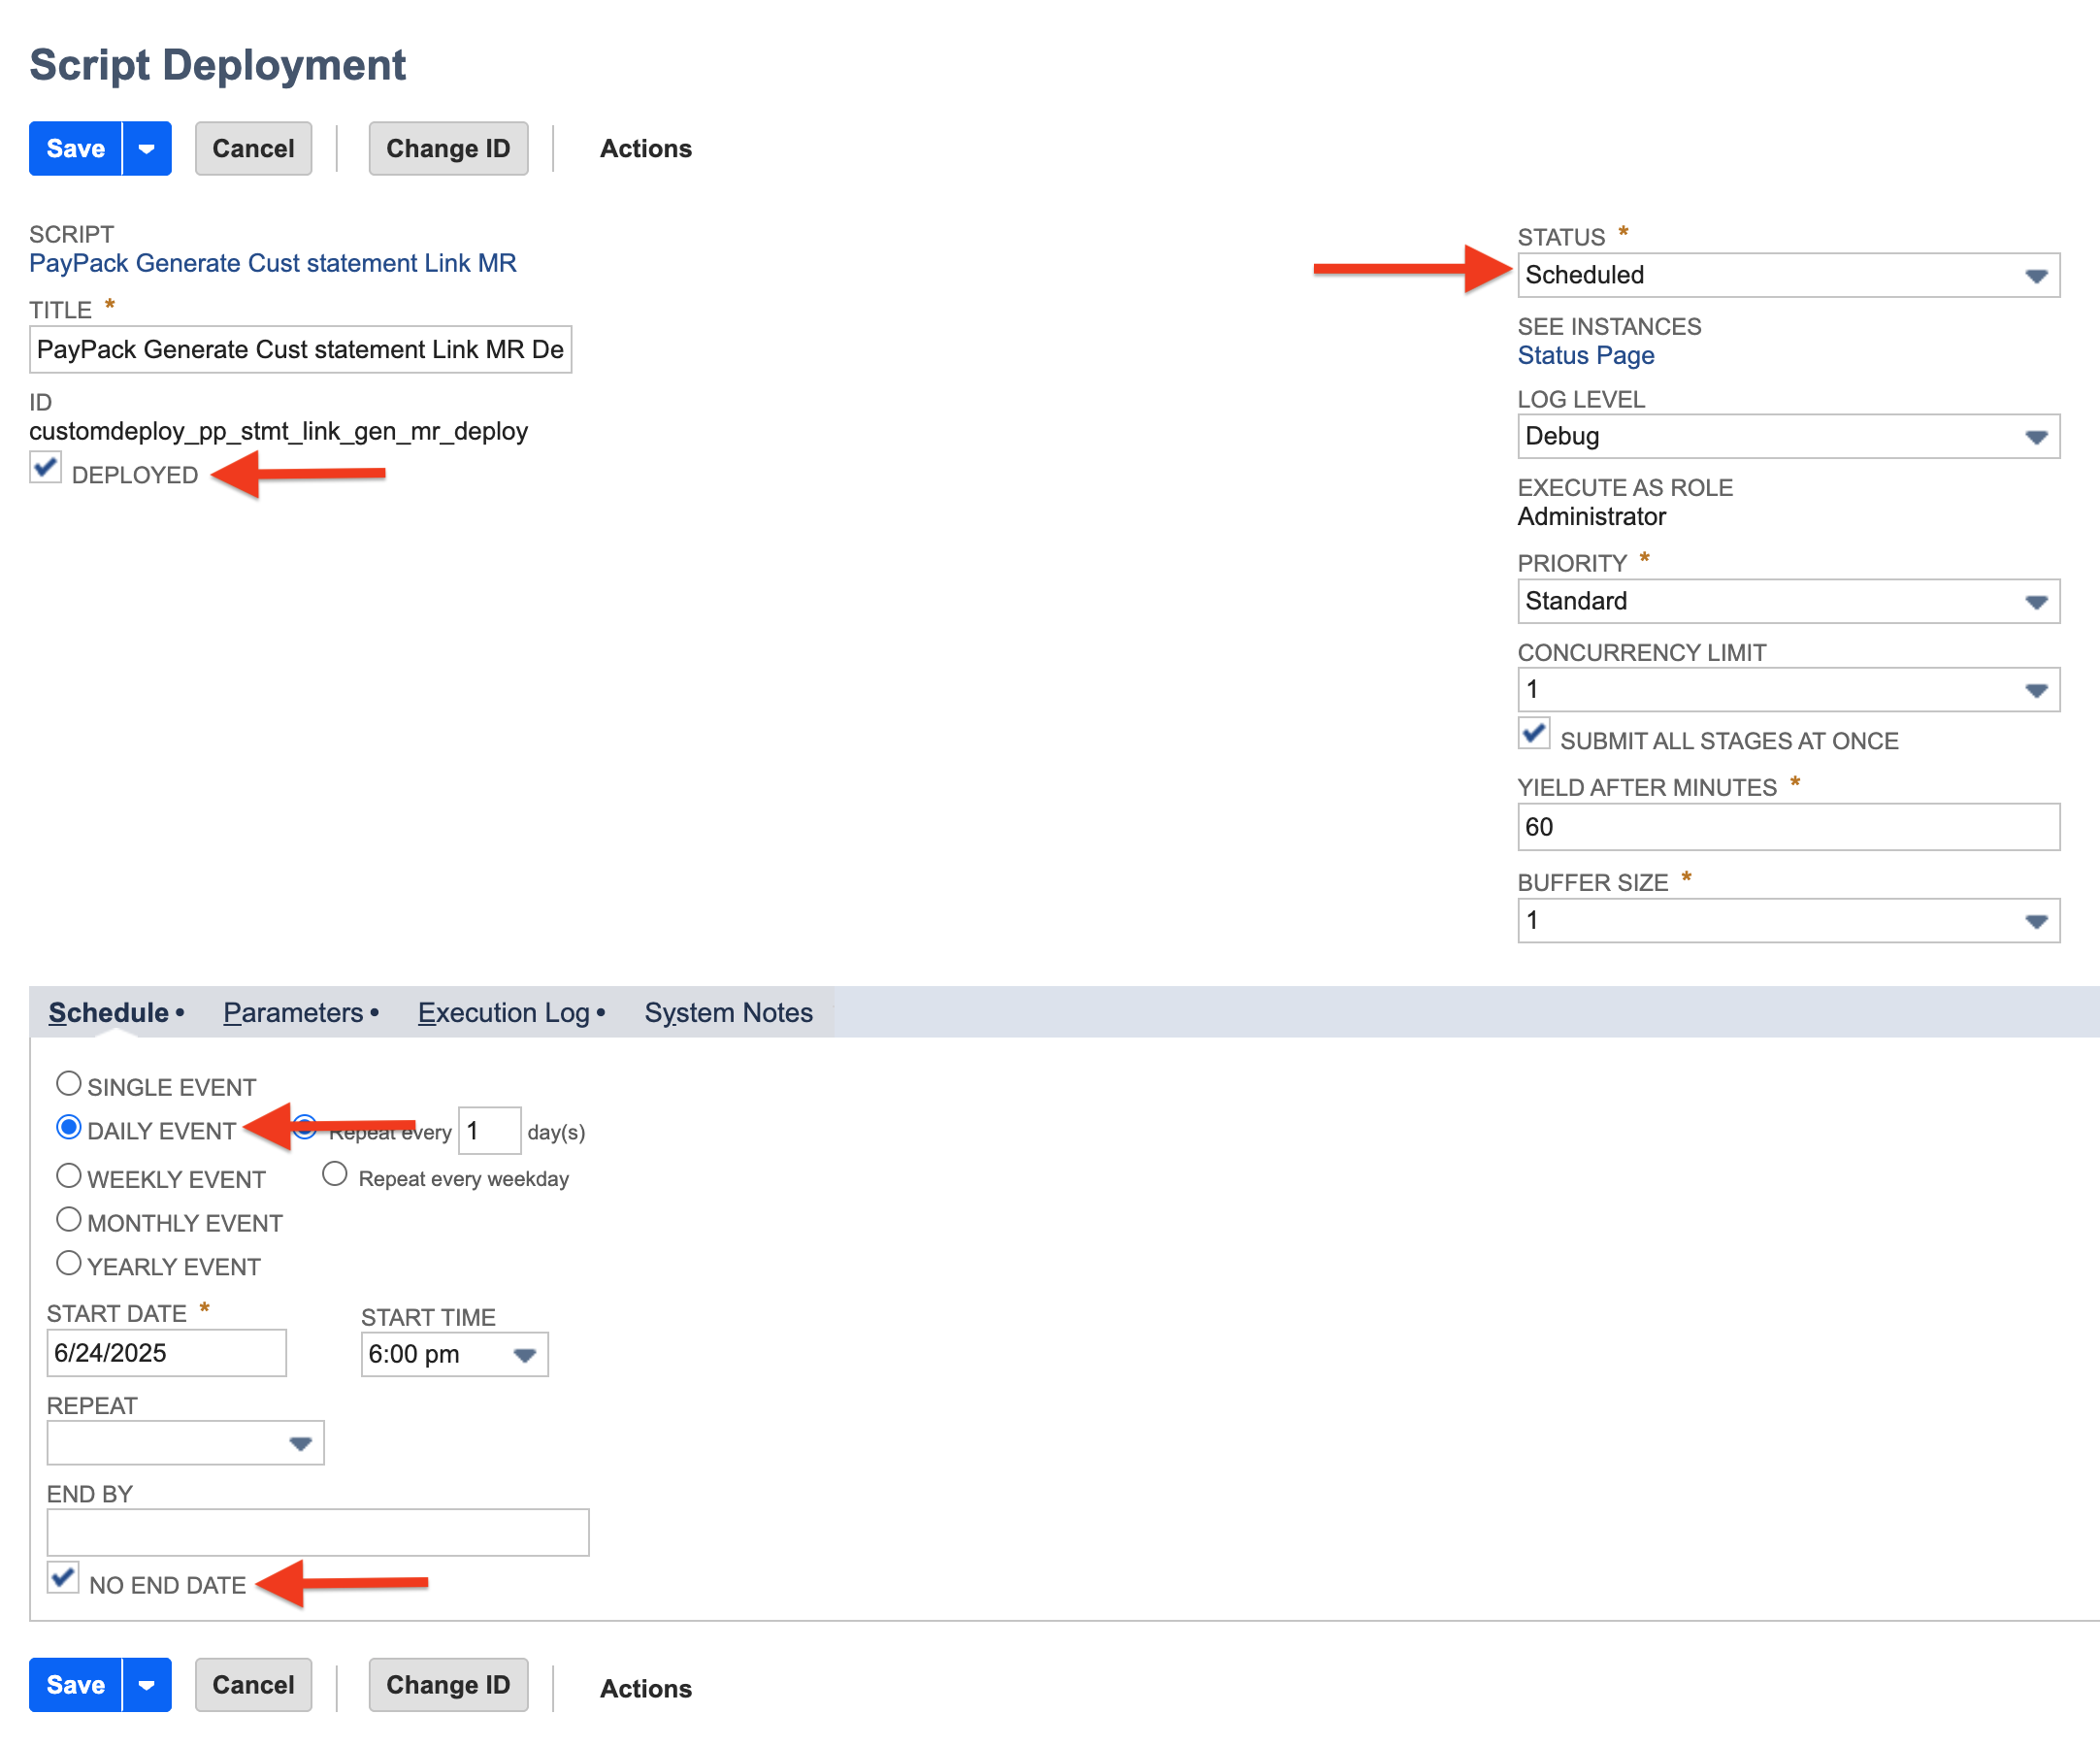
This will take you to the Script Deployment page. If you use multiple Stripe accounts, you must create a separate deployment for each one. On the deployment page, locate the Stripe Account Id parameter and enter the internal ID of the corresponding PayPack Stripe Accounts Configuration record.
Scheduling the Script
You can run the script once or schedule it to run on a recurring basis.
- For the First Run (or a single execution):
- Navigate to Customization → Scripting → Script Deployments.
- Find the PayPack Generate Statement Link MR deployment and click Edit.
- (For multi-stripe setups) On the Parameters subtab, ensure the correct Stripe Account ID is entered.
- Hover over the Save button and select Save & Execute.
- For Recurring Runs:
- On the script deployment page, click Edit.
- Go to the Schedule subtab.
- Set the frequency (Daily, Weekly, Monthly, etc.), Start Date, and repeat interval.
- Check the No End Date box or set a specific End Date.
- Click Save.
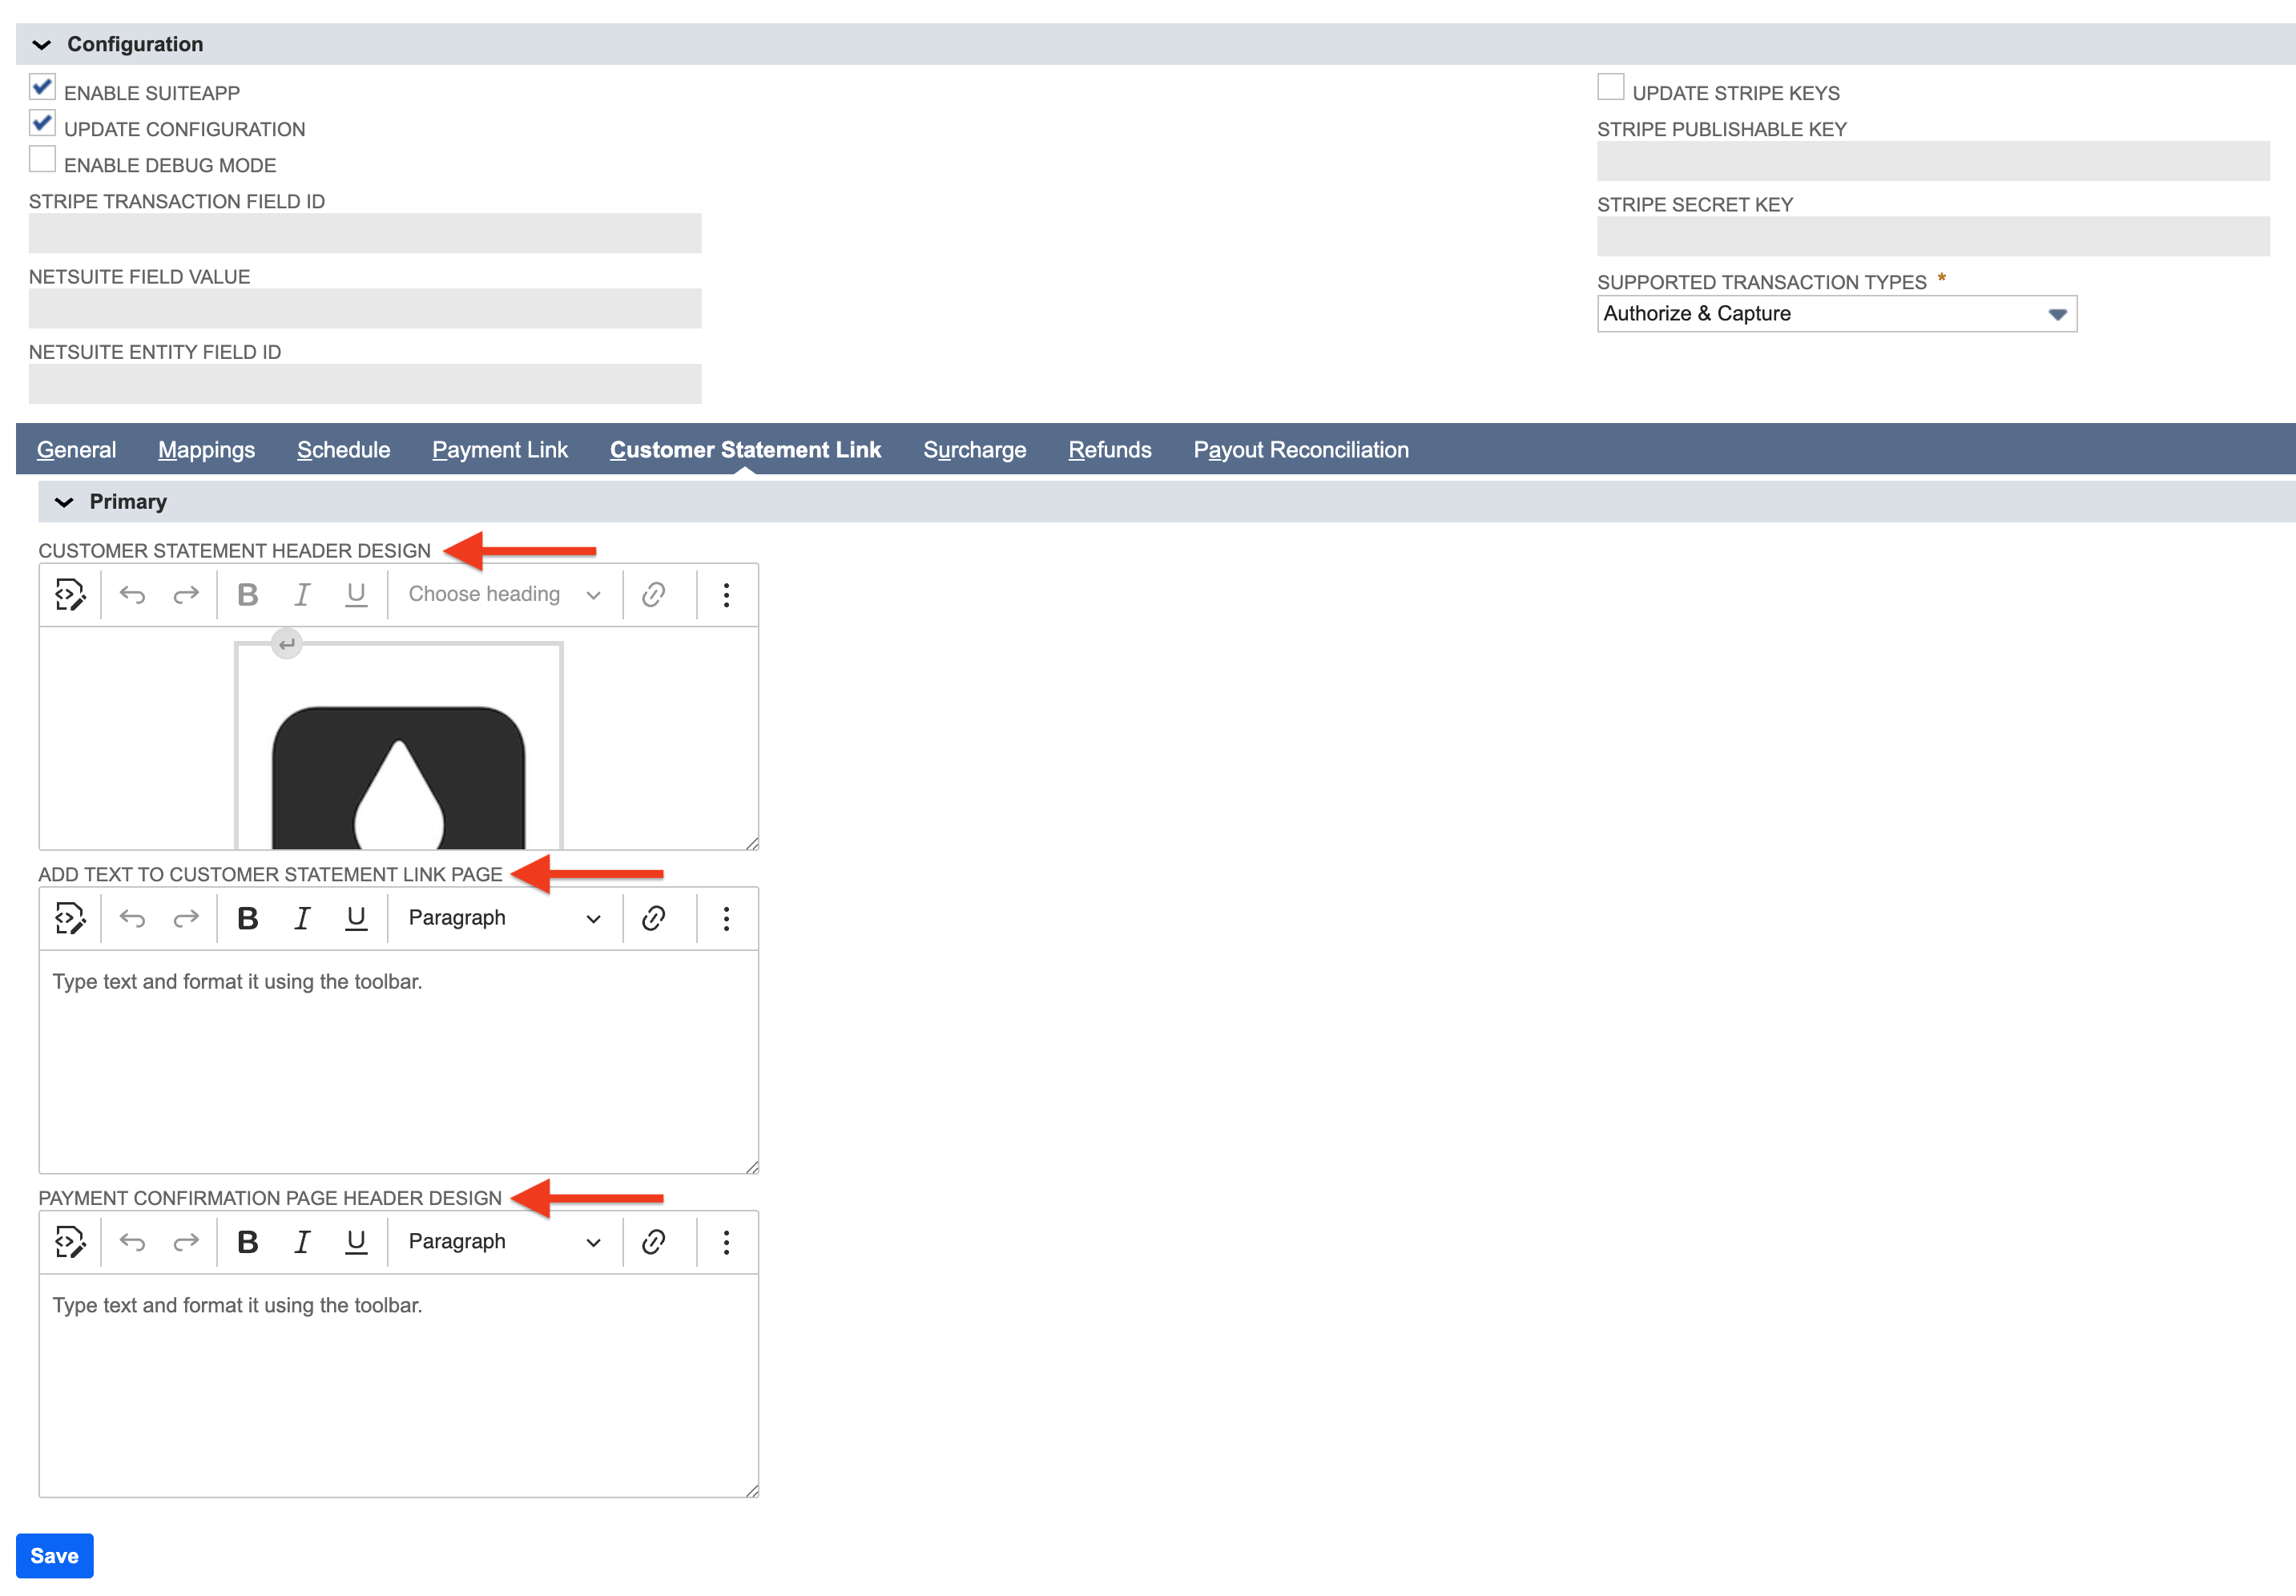
Customize the Header & Footer
Update the header or footer design using the WYSIWYG editors.
- Customer Statement Header Design (label) is used for anything above the payment form.
- Add Text to Customer Statement Link Page (label) is used for anything below the payment form.
- Payment Confirmation Page Header Design (label) is used for anything above the successful payment form.
The Customer Experience
The Statement Page
When a customer clicks their unique link, they are taken to a statement page that displays:
- A list of all their open invoices and credit memos.
- A currency dropdown menu if they have transactions in more than one currency.
From here, the customer can select the invoices and credit memos they wish to pay and see the total selected amount update in real-time.
The Payment Process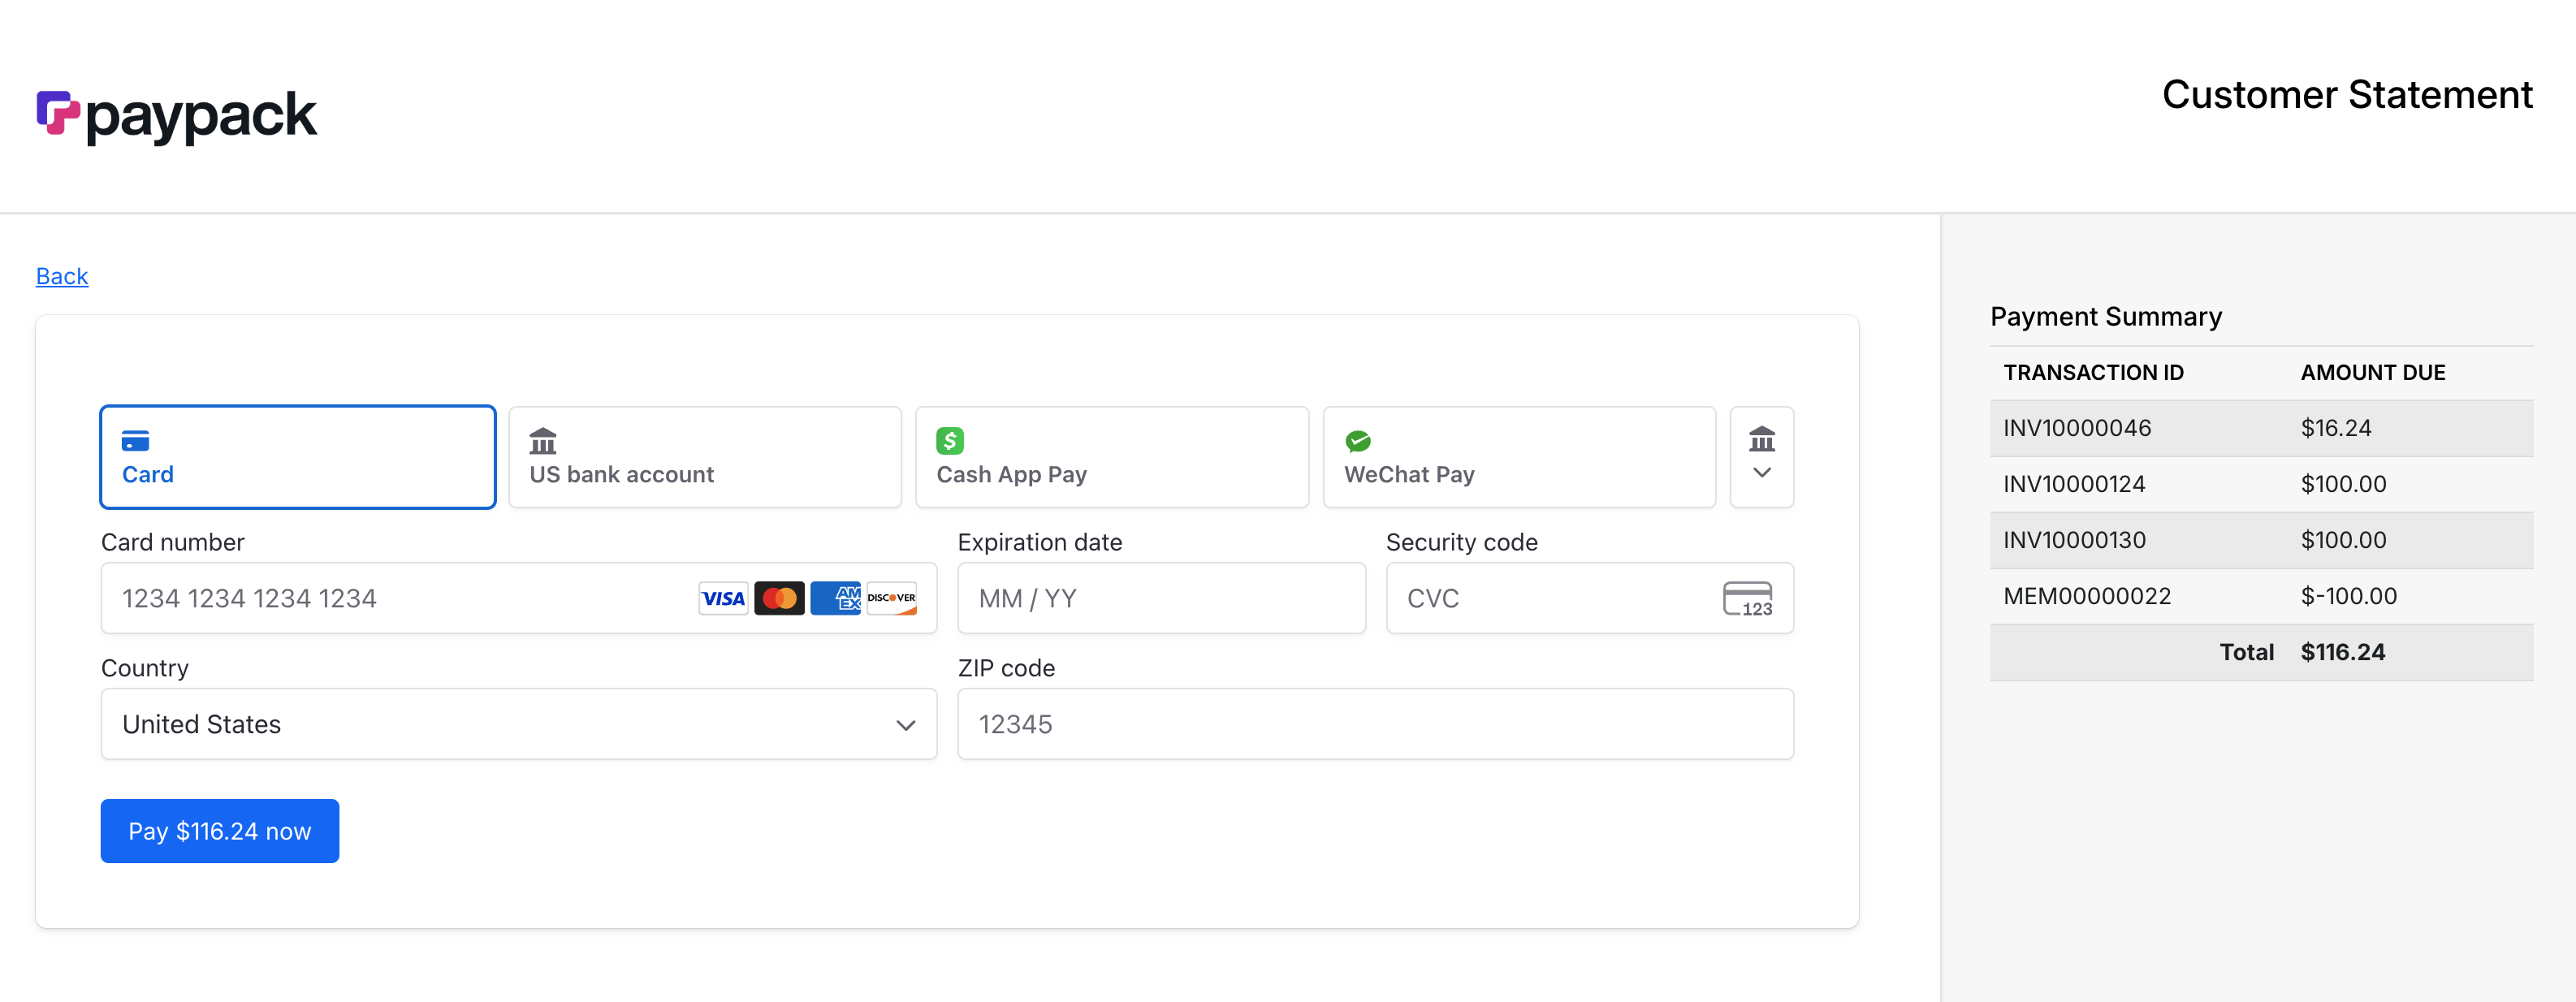
- After selecting items, the customer clicks Review and Pay.
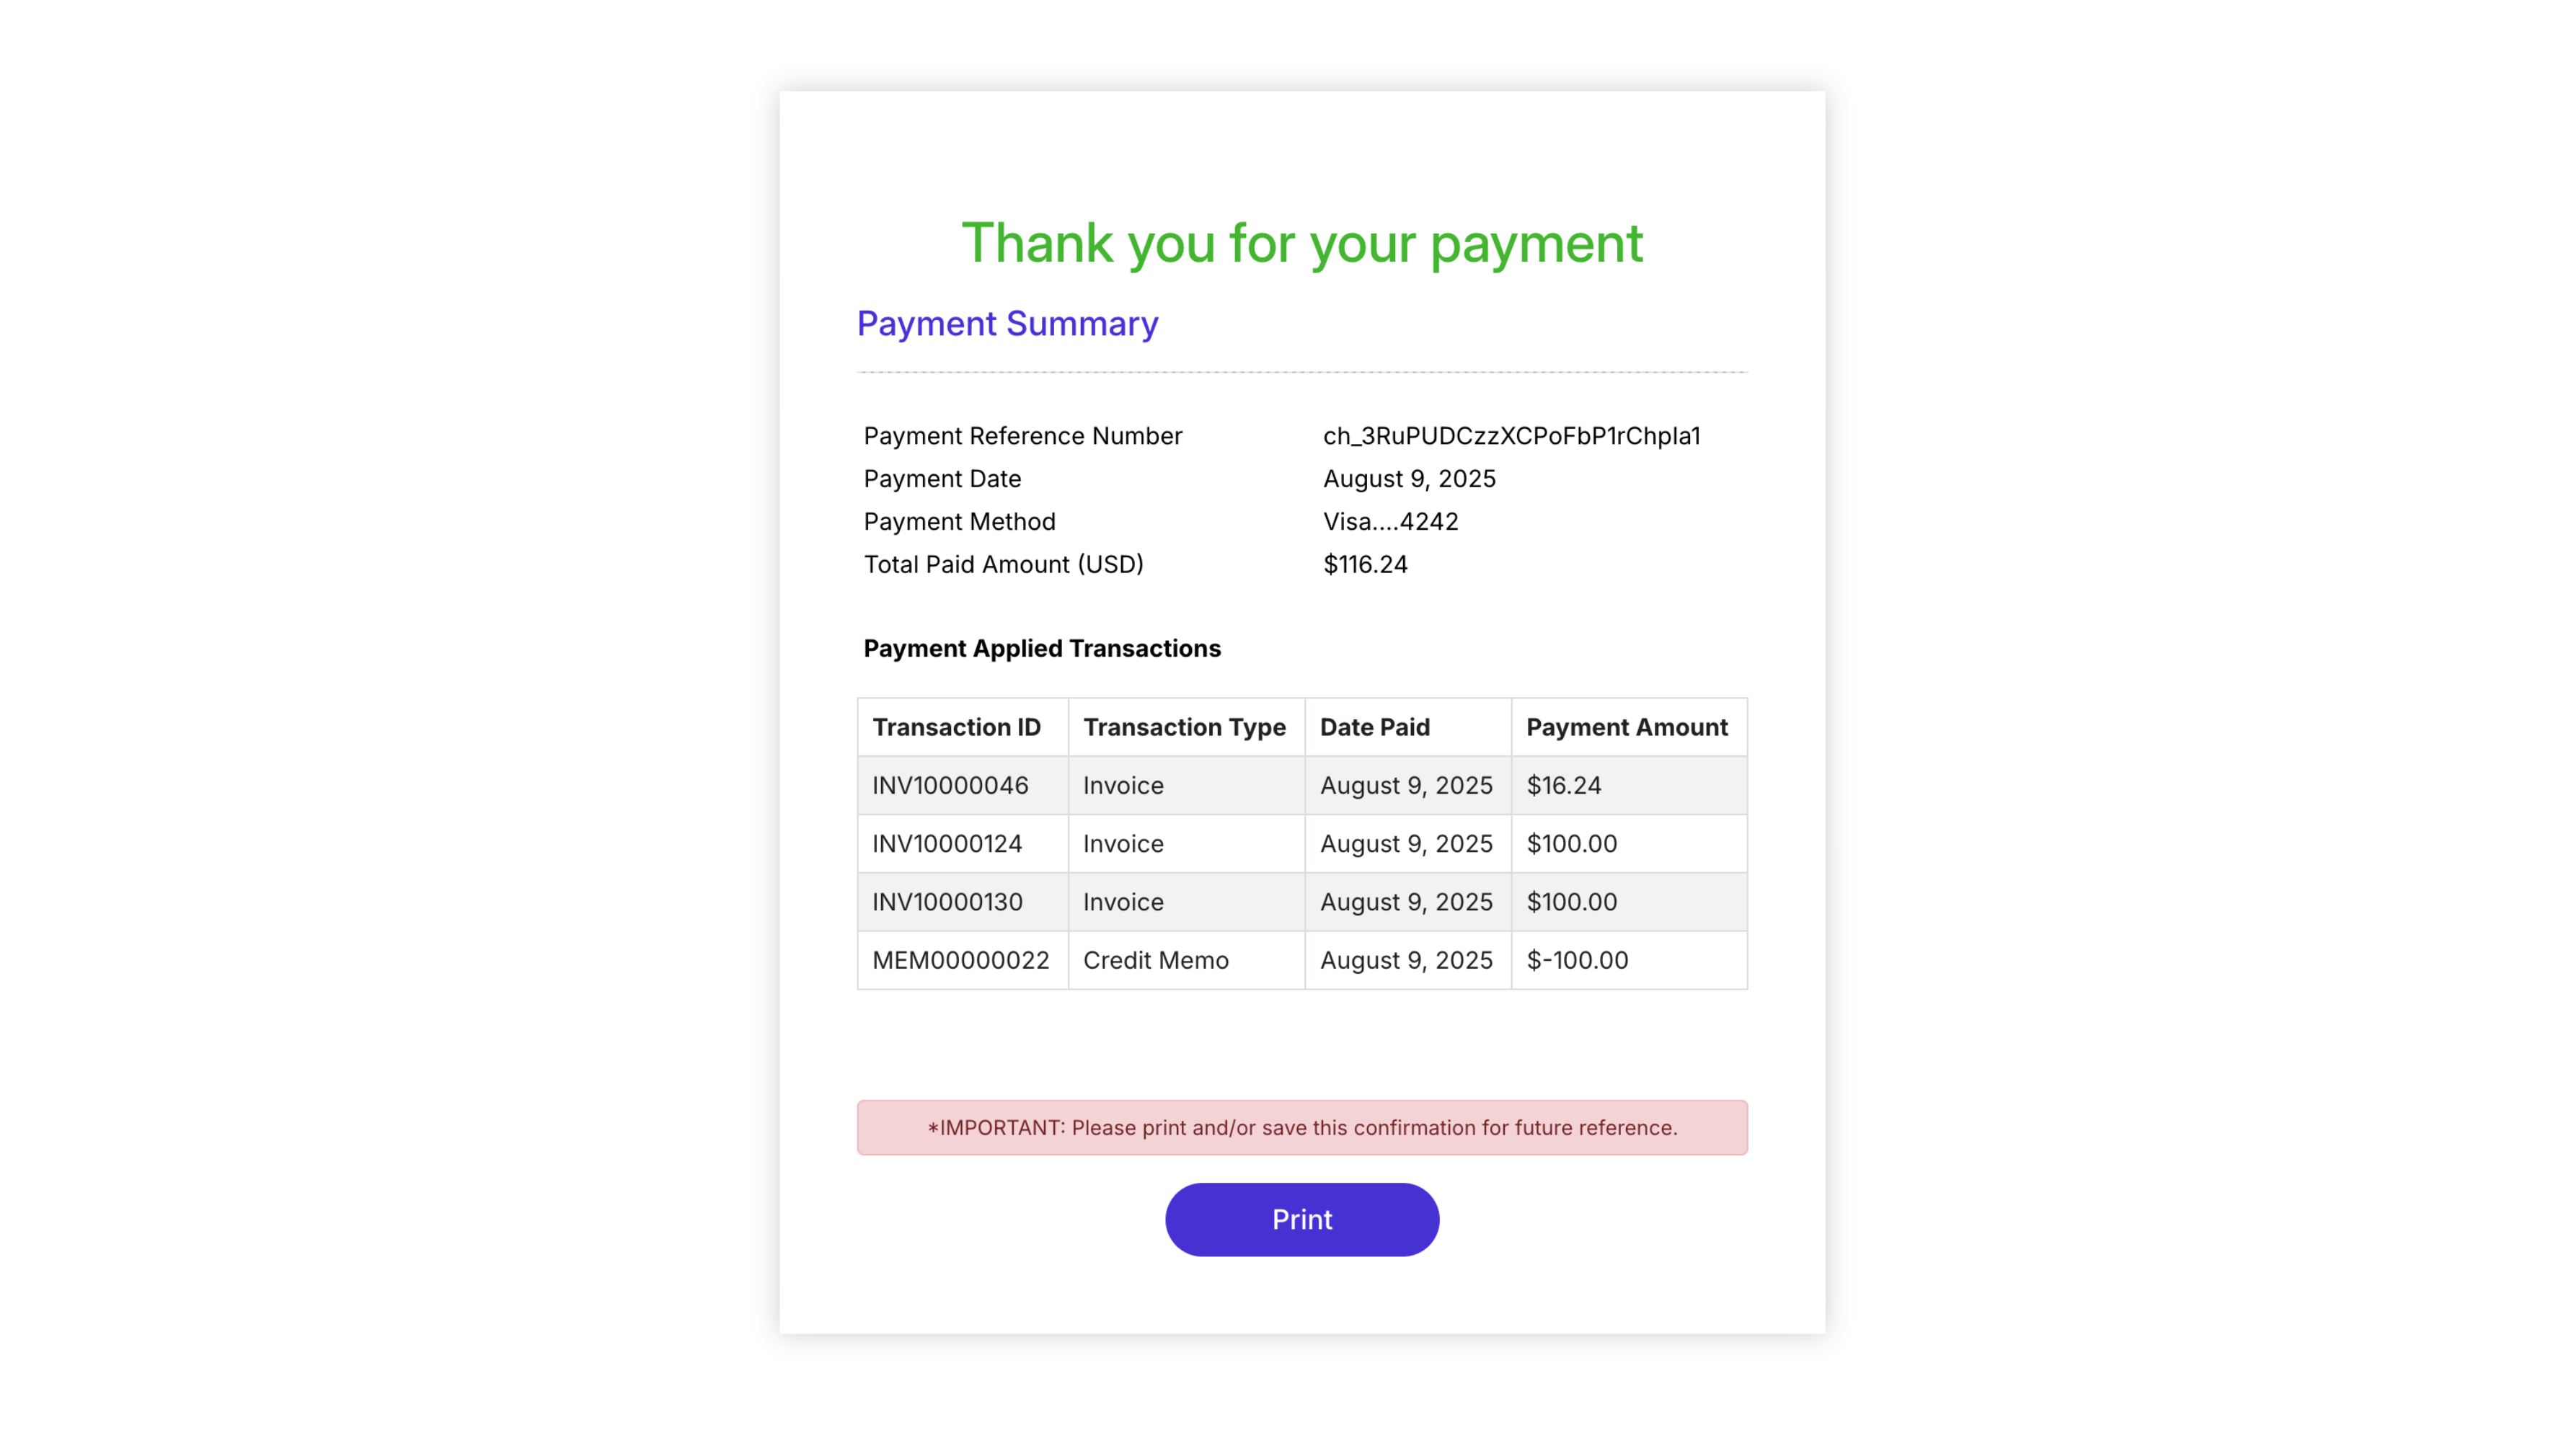
- This action immediately creates a Customer Statement Log in NetSuite and redirects the customer to a secure Stripe Checkout session.

- The customer enters their payment details and completes the transaction.
- Upon successful payment, the system adds a link to the NetSuite statement log in the Stripe transaction's metadata for easy cross-referencing.
Automated Record Management in NetSuite
PayPack automates record creation and cleanup to ensure your data stays accurate and tidy.
Post-Payment Record Creation
After a successful Stripe payment, the system automatically creates several records in NetSuite. The payment logic works as follows:
- Any selected credit memos are first applied to the selected invoices.
- Any remaining invoice balance is then settled by creating a Customer Payment record and applying it accordingly.
- Logs such as the PayPack Payment Intent Log and PayPack Charge Log are also created.
Processing ACH and Errored Transactions
For transactions that are not processed in real-time (like ACH) or that encounter errors, you must run the PayPack Statement Link Process MR script to create the necessary records in NetSuite.
- To run or schedule this script, navigate to Customization → Scripting → Script Deployments, select PayPack Customer Statement Process MR, and follow the same steps outlined above for running (Save & Execute) or scheduling a script deployment.
- NOTE: In the PayPack Customer Statement Log, Checkout Session Status must be Processing for the script to attempt recreating the NetSuite records.
Deleting Logs for Expired Sessions
To maintain data cleanliness, a separate script helps delete statement logs from abandoned checkout sessions. This script prevents your system from being cluttered with records from incomplete transactions.
- How it works: The PayPack Expired CS Logs Deletion MR script deletes logs for checkout sessions that were never completed. To avoid deleting active sessions, it only targets logs that are more than 10 days old and have no associated payment.
- To run or schedule this script, navigate to Customization → Scripting → Script Deployments, select PayPack Expired CS Logs Deletion MR, and follow the steps to run or schedule it as needed.