Email NotificationsUpdated 6 months ago
PayPack is able to deliver email notifications to customers using native NetSuite’s email templates. This ensures that any customer notifications are aligned with NetSuite workflows.
Send Automated Email on Successful Sales Order Payment
Choose Your Automation Method
- SuiteFlow Workflow: In the context of NetSuite, workflows are a fundamental tool that allows businesses to automate, streamline, and manage their processes more effectively.
- Workflows are designed to guide data through a series of defined stages, actions, and conditions, ensuring that tasks are completed in a consistent and efficient manner.
- SuiteScript User Event Script: Offers more control, customization, and integration with other systems.
SuiteFlow Workflow
- Create a Workflow:
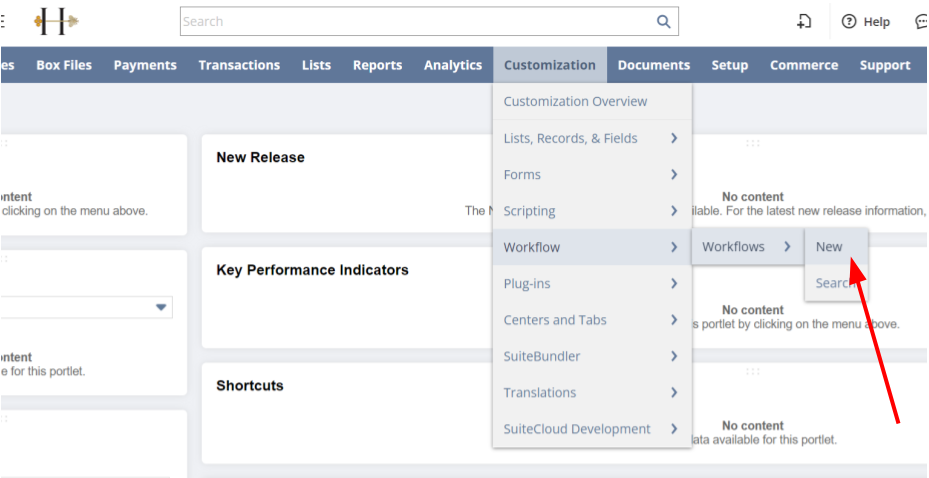
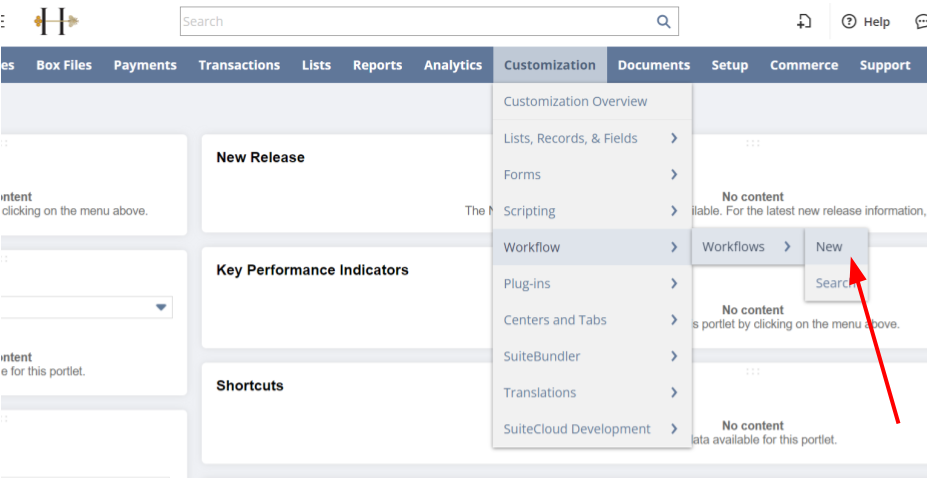
- Go to Customization > Workflow > Workflows.
- Click New Workflow.
- Basic Information:
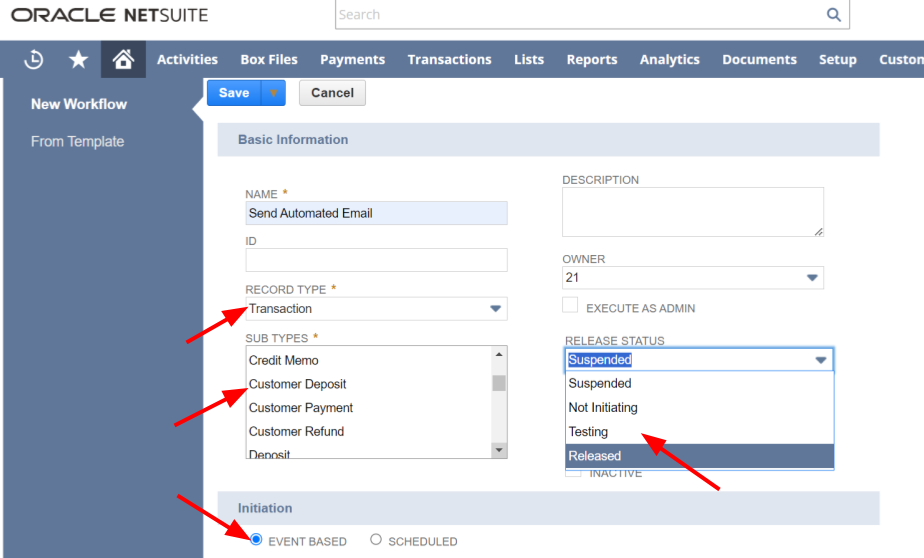
- Name the workflow.
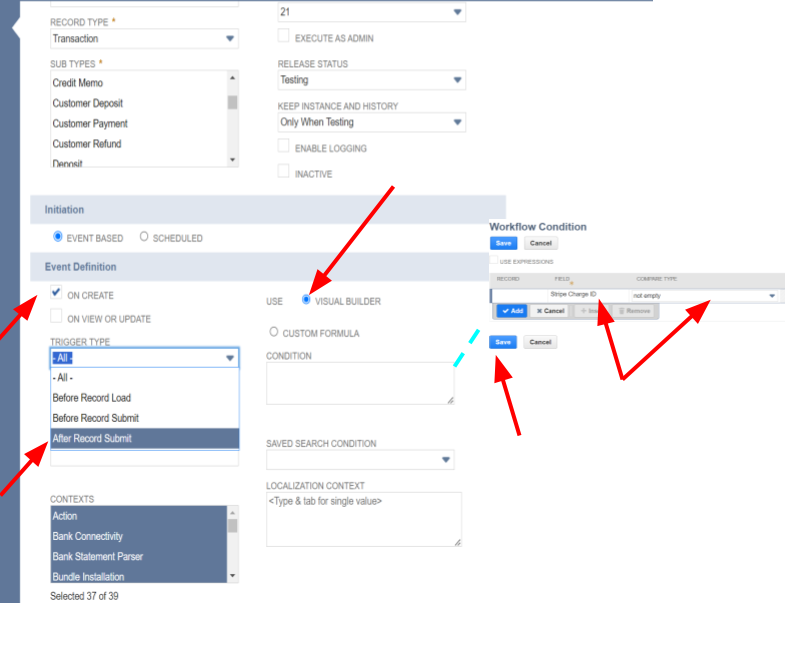
- Select the Record Type as "Transaction"
- Select “Customer Deposit” from “Sub Types”
- Select “Released” from Release Status drop down
- Set Initiation as “Event Based”
- Event Definition:
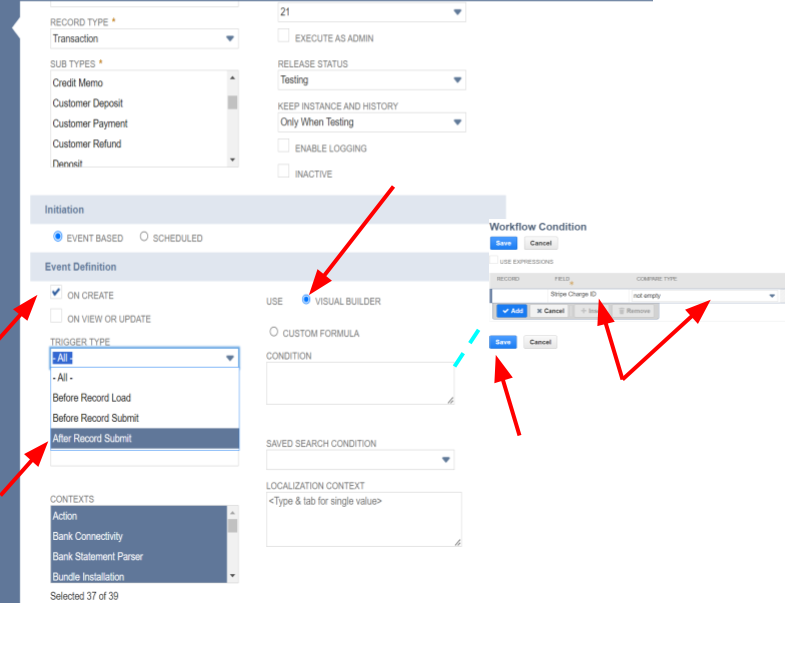
- Check the checkbox for “On Create”
- Select the “After Record Submit” in the “Trigger Type” drop down field
- Select the “Visual Builder” as Use option
- In the Condition option, click on open button and select “Stripe Charge Id (PayPack)” from the Field dropdown and select the “not empty” from the CompareType drop down and save the Workflow condition
- Finally click on the Save button to save the Workflow
- Define Workflow States and Actions:
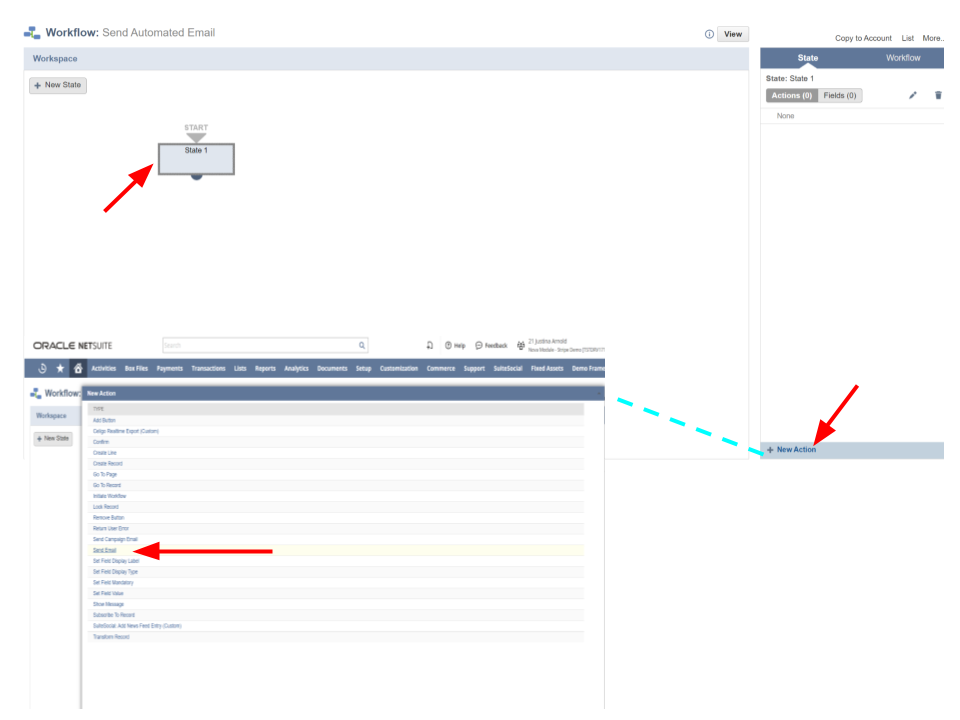
- Click on the “State 1” from Workflow Workspace
- Click on the “New Action” under the State tab on the right handside.
- Select the “Send Email” type from the New Action popup screen
- Workflow Action:
- Select the Sender from the Sender drop down under Sender section
- Select the Email Template in the Content section that you created on the above
- Check the “From Field” from the Recipient section
- Select the “Sales Order” from the Record (Join Field) drop down field
- Then select the “Email” from Field the drop down
- Save the Workflow action
From now on, whenever the conditions you define in the workflow are satisfied—for instance, when a Stripe Charge ID (PayPack) is added or updated—the workflow will automatically initiate, sending the customer the email constructed using your chosen template.
SuiteScript User Event Script
- Create User Event Script:
- Go to Customization > Scripting > Scripts > New.
- Select User Event script type.
- Implement beforeSubmit Function:
- Check for Customer Deposit record, and context.UserEventType.CREATE.
- Stripe Charge Id (PayPack) is not empty (This means this field is added by PayPack solution)
- Use the N/email module to send email with relevant details.
- Deploy Script:
- Save and deploy the script.
- Attach it to the Customer Deposit record type.
Send Automated Email on Successful Invoice Payment
Choose Your Automation Method
- SuiteFlow Workflow: In the context of NetSuite, workflows are a fundamental tool that allows businesses to automate, streamline, and manage their processes more effectively.
- Workflows are designed to guide data through a series of defined stages, actions, and conditions, ensuring that tasks are completed in a consistent and efficient manner.
- SuiteScript User Event Script: Offers more control, customization, and integration with other systems.
SuiteFlow Workflow
- Create a Workflow:
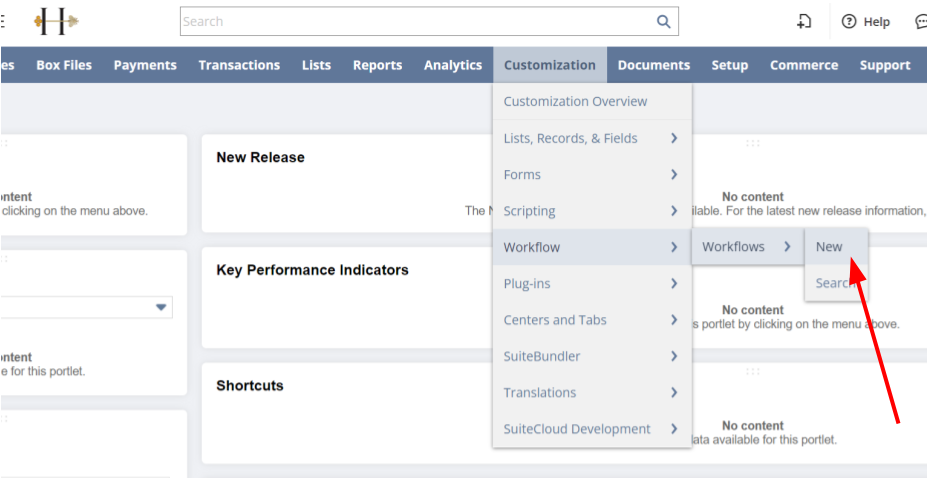
- Go to Customization > Workflow > Workflows.
- Click New Workflow.
- Basic Information:
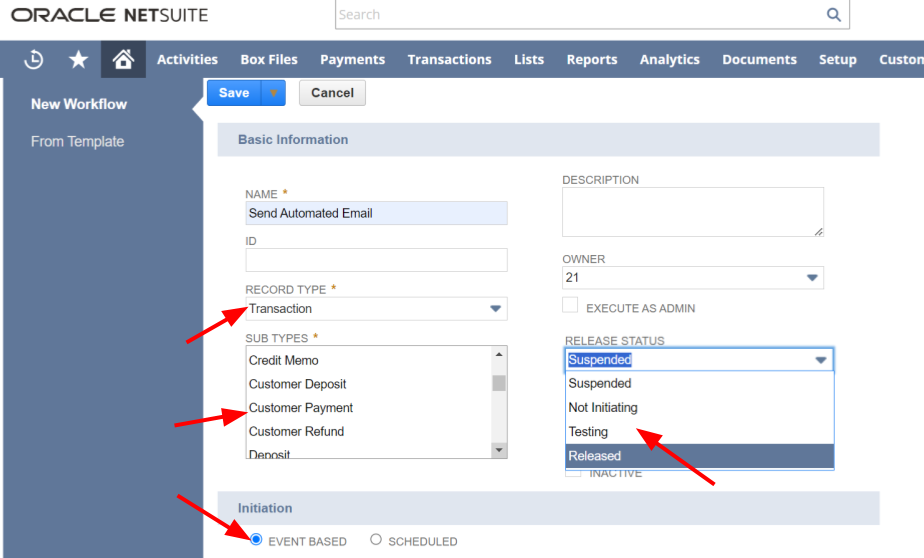
- Name the workflow.
- Select the Record Type as "Transaction"
- Select “Customer Payment” from “Sub Types”
- Select “Released” from Release Status drop down
- Set Initiation as “Event Based”
- Event Definition:
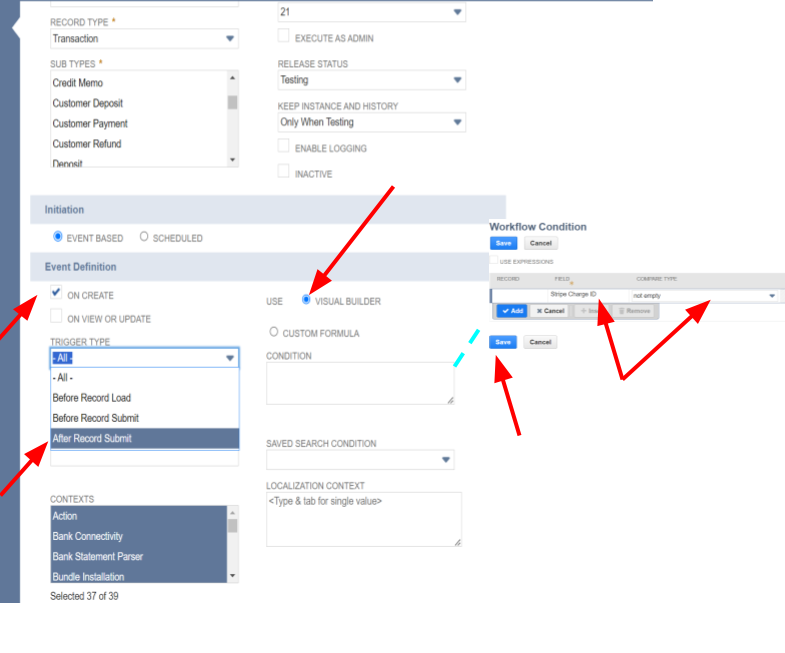
- Check the checkbox for “On Create”
- Select the “After Record Submit” in the “Trigger Type” drop down field
- Select the “Visual Builder” as Use option
- In the Condition option, click on open button and select “Stripe Charge Id (PayPack)” from the Field dropdown and select the “not empty” from the CompareType drop down and save the Workflow condition
- Finally click on the Save button to save the Workflow
- Define Workflow States and Actions:
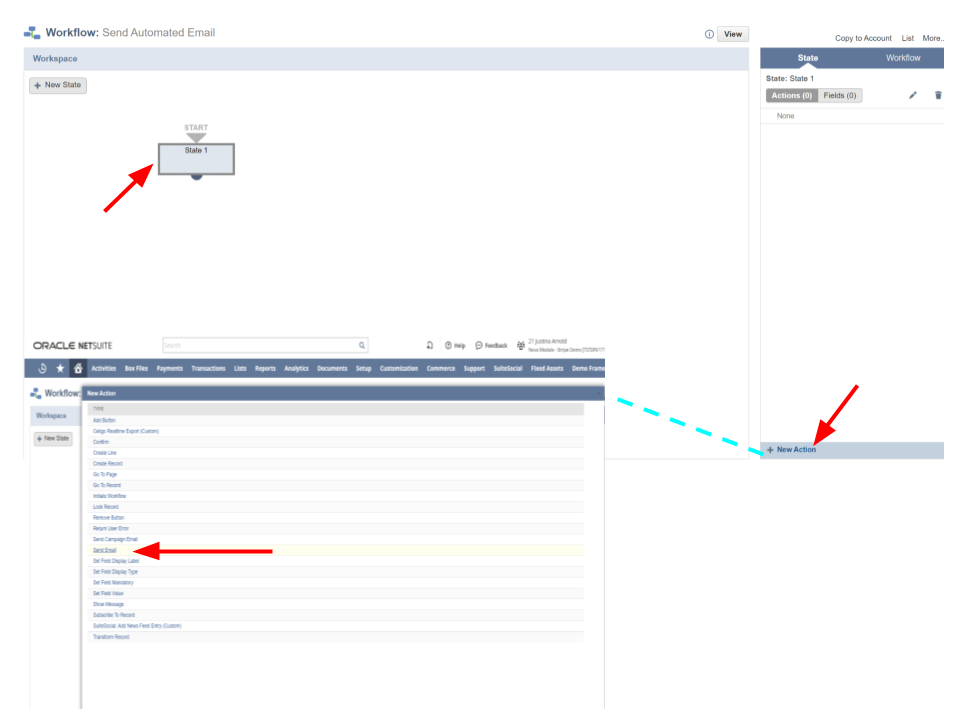
- Click on the “State 1” from Workflow Workspace
- Click on the “New Action” under the State tab on the right handside.
- Select the “Send Email” type from the New Action popup screen
- Workflow Action:
- Select the Sender from the Sender drop down under Sender section
- Select the Email Template in the Content section that you created on the above
- Check the “From Field” from the Recipient section
- Select the “Customer (Payments and Deposits)” from the Record (Join Field) drop down field
- Then select the “Email” from Field the drop down
- Save the Workflow action
From now on, whenever the conditions you define in the workflow are satisfied—for instance, when a Stripe Charge ID (PayPack) is added or updated—the workflow will automatically initiate, sending the customer the email constructed using your chosen template.
SuiteScript User Event Script
- Create User Event Script:
- Go to Customization > Scripting > Scripts > New.
- Select User Event script type.
- Implement beforeSubmit Function:
- Check for Customer Payment record, and context.UserEventType.CREATE.
- Stripe Charge Id (PayPack) is not empty (This means this field is added by PayPack solution)
- Use the N/email module to send email with relevant details.
- Deploy Script:
- Save and deploy the script.
- Attach it to the Customer Payment record type.